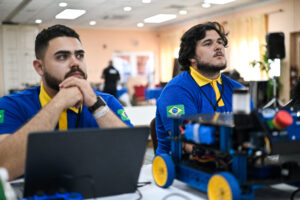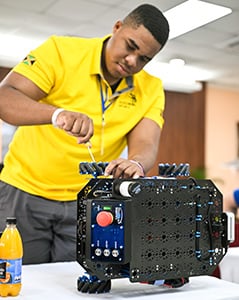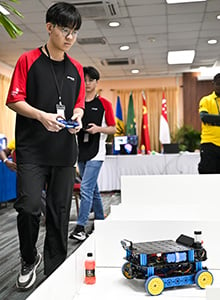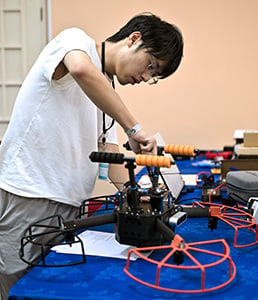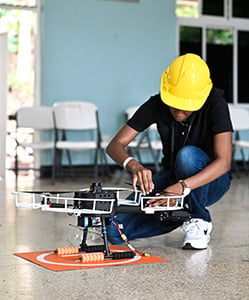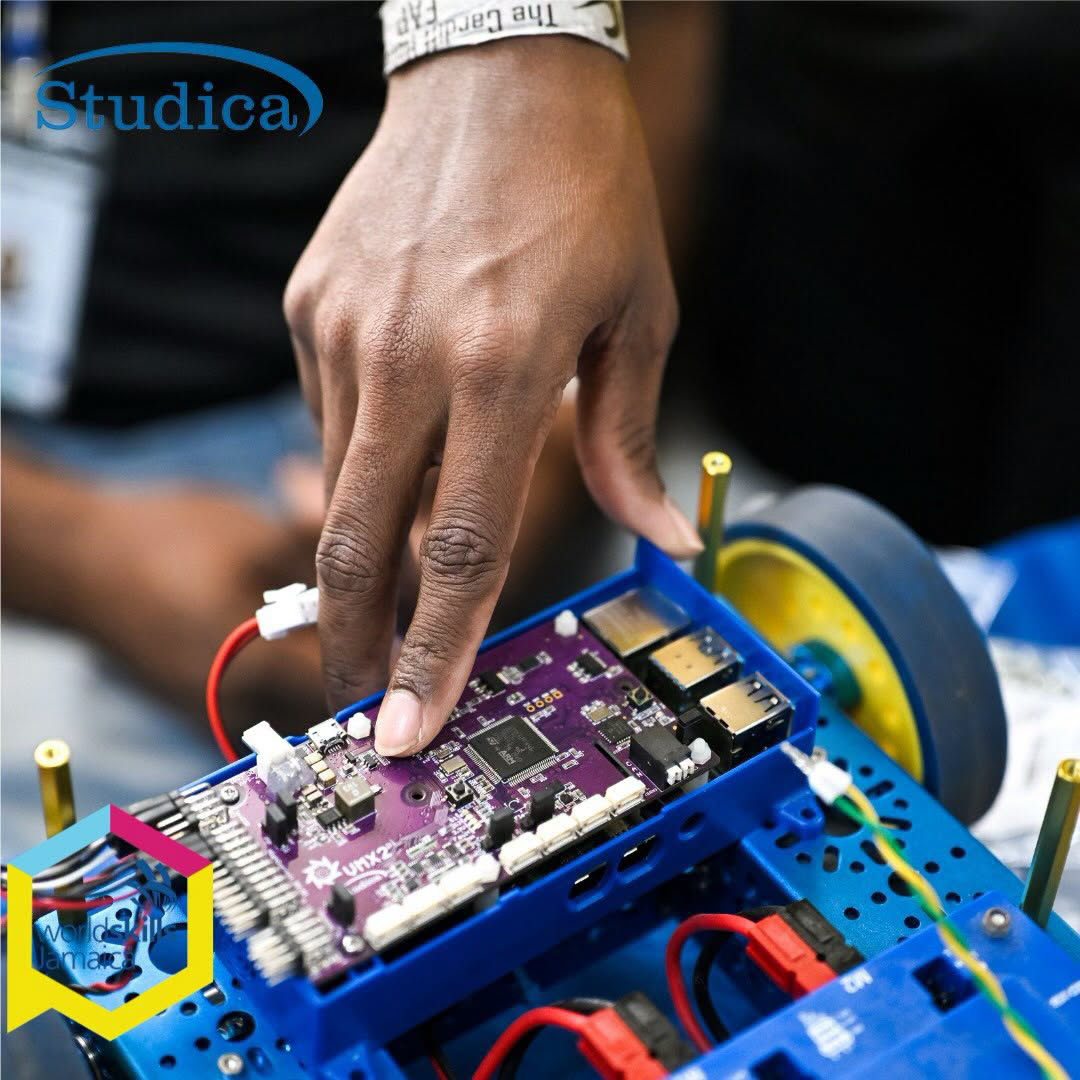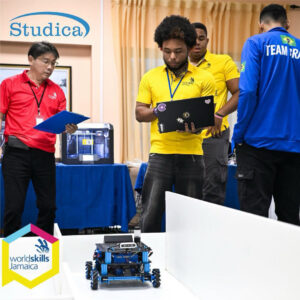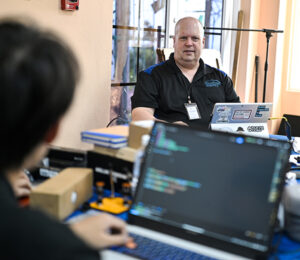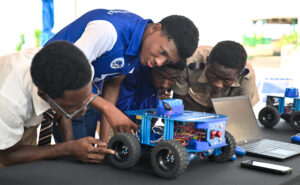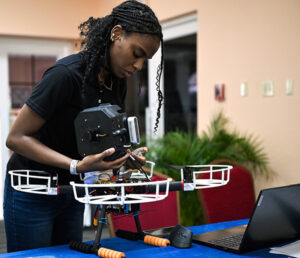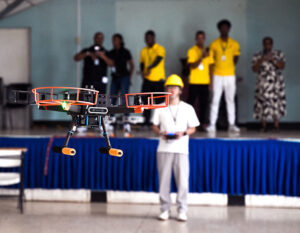










Quick Summary: International competitors gathered in Jamaica for a five-day robotics training camp designed to prepare them for WorldSkills Shanghai 2026. In partnership with Studica Robotics, the program focused on Autonomous Mobile Robotics (AMR) and Unmanned Aerial Systems (UAS), combining hands-on robot and drone training with real-world competition preparation. Participants progressed from system setup and assembly to programming, testing, and evaluation. The goal was to build both technical and teamwork skills needed for global competition success.
As global demand for automation and intelligent systems continues to grow, WorldSkills Shanghai 2026 is placing a strong emphasis on advanced robotics training in Autonomous Mobile Robotics (AMR) and Unmanned Aerial Systems (UAS), where competitors must apply engineering principles in real time under international competition standards.
This type of robotics training goes beyond technical instruction; it mirrors the environments shaping modern industry, from smart manufacturing and autonomous logistics to precision agriculture, infrastructure inspection, and emergency response systems. Participants gain hands-on experience with technologies that are actively transforming how work is designed and delivered worldwide.
By working through real-world challenges in both AMR and UAS, competitors strengthen not only their technical capabilities but also their problem-solving, adaptability, and collaboration skills essential for success at WorldSkills Shanghai 2026 and beyond.
![]() |
![]() |
![]() |
![]() |
The five-day training camp followed a progressive learning model that moved competitors from foundational system setup to competition-level performance in both Autonomous Mobile Robotics (AMR) and Unmanned Aerial Systems (UAS). Each phase built upon the previous one, combining technical instruction, hands-on application, and performance evaluation.
| Training Phase | Activities & Outcomes |
|---|---|
| Phase 1: Foundation and Team Building | Competitors were introduced to the competition environment, assembled workstations, reviewed system components, and built connections with participants and experts from around the world. |
| Phase 2: Technical Immersion | Participants explored ROS2, tele-operation, SLAM, grid-based mapping, autonomous navigation, and drone control systems while integrating hardware and software components. |
| Phase 3: Competition Simulation | Teams applied their knowledge through autonomous navigation challenges, flight exercises, troubleshooting activities, and real-time decision-making under competition conditions. |
| Phase 4: Performance Optimization | Competitors refined system performance, debugged technical issues, optimized navigation and control strategies, and received coaching from international experts. |
| Phase 5: Evaluation and Showcase | The program concluded with system demonstrations, drone mission execution, performance assessments, and evaluations of teamwork, communication, and technical readiness. |
By the end of the program, participants had progressed from assembling and configuring systems to executing autonomous navigation tasks, flying drones under performance constraints, and demonstrating the teamwork and technical proficiency required for WorldSkills competition.
![]() |
![]() |
![]() |
![]() |
"Through international collaboration, knowledge sharing, and hands-on learning, participants are gaining valuable exposure to industry-leading practices in autonomous mobile robotics." -Walace Felipe de Almeida Oliveira, WorldSkills Brazil
“Robotics is not an activity that only men can partake in. Women can, as well, and we’re living proof of this…”
- St. Hilda’s Diocesan High School Team Captain, Toria-Lee Martin
“If you want to beat the best, you have to see how the best train.”
- Derek Murphy, General Manager, Studica Robotics
Autonomous Mobile Robotics (AMR) is one of the fastest-growing areas in technical education and modern industry. It focuses on designing and building robots that can move and operate independently using sensors, control systems, and intelligent programming. Through AMR training, participants develop a wide range of integrated engineering skills, including mechanical and electronic system design, sensor integration, and automation. They also strengthen their ability to program autonomous systems, enabling robots to navigate, map environments, and respond to real-world conditions. AMR training also develops problem-solving and teamwork skills, reflecting the collaborative nature of real-world engineering environments.
Unmanned Aerial Systems (UAS) are rapidly expanding across industries and are becoming essential in areas such as infrastructure inspection, agriculture, logistics, disaster response, and environmental monitoring.
Training in UAS helps participants understand both the mechanical and digital systems behind drone technology. This includes building and configuring aerial systems, programming flight behavior, and developing the ability to troubleshoot and diagnose technical issues. As with AMR, this training strengthens critical thinking, engineering methodologies, and technical collaboration. These skills are increasingly in demand across aerospace, advanced manufacturing, infrastructure inspection, and emerging drone technology sectors.
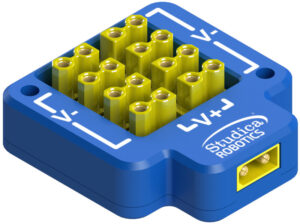
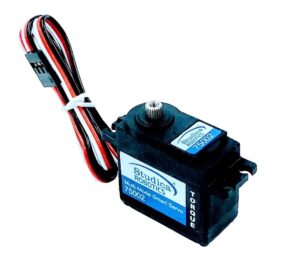
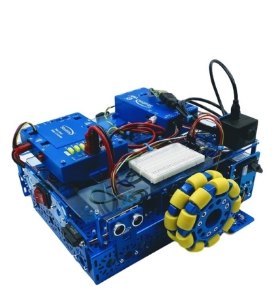
With over 40 years of experience supporting technical education, Studica Robotics provides standardized training kits, curriculum resources, and technical support for WorldSkills member countries. For AMR competitions, teams use the official WorldSkills Autonomous Mobile Robotics Collection. For UAS training, participants utilize the WS500 Quadcopter Kit to build, program, and operate drone systems while also developing troubleshooting and diagnostic skills.
This structured ecosystem helps ensure consistent training quality while encouraging collaboration and peer learning across countries. Through its partnership with WorldSkills, Studica Robotics helps member countries develop robotics and UAS skills by providing standardized equipment, training resources, and competition support.
Beyond technical preparation, the training camp is designed to build long-term capabilities that extend well beyond the competition itself. It strengthens real-world engineering and robotics skills by providing competitors with hands-on experience with systems they will encounter in advanced technical environments. At the same time, it improves collaboration within international teams, where participants must communicate, adapt, and work effectively across different cultures and approaches.
The experience also helps develop the ability to solve complex problems under the pressures of a competition environment, where timing, accuracy, and decision-making all matter. Most importantly, it supports clear pathways into future technical careers by exposing participants to industry-relevant tools, processes, and expectations.
This training camp provided competitors with an opportunity to develop their skills in a collaborative international environment while preparing for the upcoming challenges of WorldSkills Shanghai 2026.
What is Autonomous Mobile Robotics (AMR)?
AMR involves designing, building, and programming robots that operate independently using sensors, control systems, and automation logic.
What are Unmanned Aerial Systems (UAS)?
Unmanned Aerial Systems (UAS) focus on drone technology, including assembly, programming, flight control, maintenance, and system diagnostics.
Who is this WorldSkills Jamaica robotics training for?
It is designed for students and competitors preparing for international robotics competitions and technical skills development programs.
How does Studica Robotics support WorldSkills?
Studica Robotics provides standardized kits, training materials, and technical expertise to support global robotics education and competition readiness.
What is the goal of the WorldSkills Jamaica robotics training camp?
To prepare competitors for WorldSkills Shanghai 2026 through hands-on robotics and drone training under real competition conditions.
The WorldSkills Jamaica & Studica Robotics Invitational Training Camp demonstrated how immersive, hands-on learning can accelerate technical skill development and global competition readiness.
Over five days, competitors moved from foundational system understanding to full competition performance in Autonomous Mobile Robotics and Unmanned Aerial Systems. Beyond robotics, the camp strengthened collaboration, communication, and confidence. These skills are essential for success in both international competition and future technical careers.
As robotics, automation, and drone technologies continue reshaping global industries, programs like this are not just training events; they are launchpads for the next generation of skilled robotics professionals.
Quick Summary: Field-centric drive is a control system commonly used in FTC mecanum drivetrains that keeps robot movement aligned to the field instead of the robot’s orientation. Unlike robot-centric drive, drivers do not need to mentally adjust controls when the robot rotates. This article explains what field-centric drive is, how it works, the math behind it, and common considerations teams should understand before implementing it.
In traditional robot-centric teleop control, robot movement is based on the robot’s orientation. The robot has a designated “front” and “back,” and the controls rotate with the robot.
For example, if the robot turns 90 degrees to the right, pushing the joystick forward causes the robot to move toward the right side of the field because the front of the robot is now facing that direction.
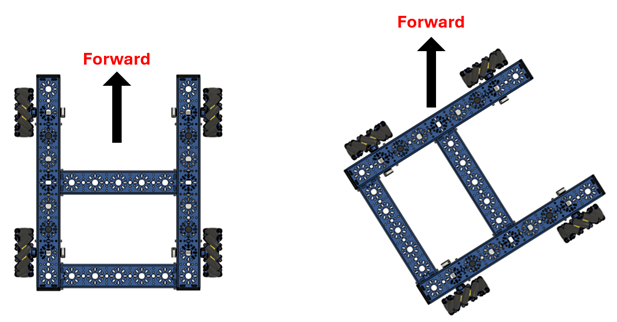
Field-centric drive changes this behavior by making movement relative to the field rather than the robot’s orientation. No matter which direction the robot faces, controls stay aligned to the driver’s perspective from the driver station.
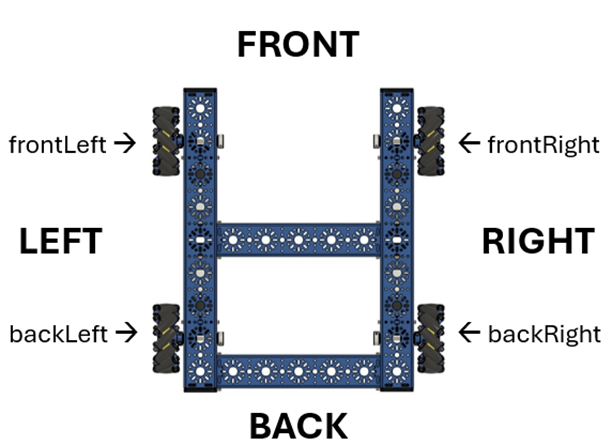
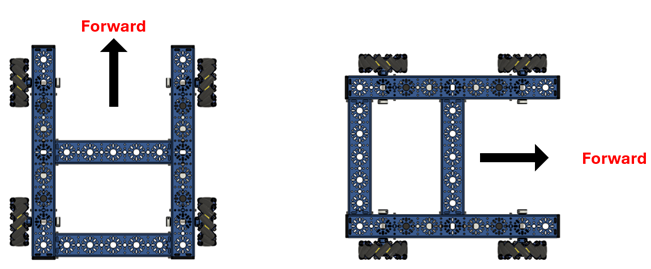
Robot Orientation Diagram for Robot-Centric
Let's take a closer look at the robot-centric drive and the field-centric drive so you can understand how and when each could work best for your team.
With robot-centric drive:
Robot-Centric Drive Perspective
With a field-centric drive:
Field-Centric Drive Perspective
Field-centric drive is commonly used in FTC because it can create a more intuitive driving experience, especially with mecanum drivetrains.
| Benefit | Description |
|---|---|
| Intuitive controls | Forward on the joystick always moves the robot forward relative to the field, regardless of robot rotation. |
| Easier navigation | Helps drivers maintain straighter paths and execute smoother strafing and diagonal movement. |
| Better focus on gameplay | Reduces mental load so drivers can focus on scoring and strategy instead of orientation. |
| Improved omnidirectional movement | Works especially well with mecanum drivetrains for full-direction movement without needing to rotate first. |
| Faster reaction time | Drivers respond more quickly because controls stay consistent under rotation. |
However, preferred drive style still depends on driver comfort and experience.
Field-centric drive works by using the robot's current heading from the IMU (Inertial Measurement Unit) to transform joystick inputs before they are applied to the drivetrain.
The driver still uses the same controls as a standard FTC mecanum drivetrain:
The difference is that the translational inputs (X and Y) are adjusted using the robot's heading, while the rotational input remains unchanged. This allows movement to remain aligned with the field instead of the robot's orientation.
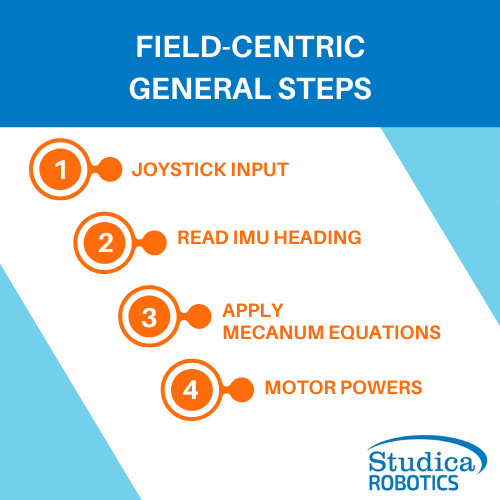
The process follows these general steps:
Joystick Input
↓
Read IMU Heading
↓
Apply Mecanum Equations
↓
Motor Powers
For example, if the robot turns 90 degrees, the software compensates for that change in orientation. As a result, pushing the joystick forward still moves the robot forward relative to the field, regardless of which direction the robot is facing.
Field-centric drive works by mathematically rotating the driver's joystick input based on the robot's heading from the IMU. This allows the robot to maintain field-relative movement regardless of its orientation.
The process can be summarized in three steps:
The coordinate transformation used for field-centric control is:
x′ = x cosθ + y sinθ
y′ = y cosθ − x sinθ
Where:
These equations rotate the joystick input to compensate for robot orientation while preserving the driver's intended direction of travel.
The corrected values are then used in the mecanum drive equations:
FrontLeft = y′ + x′ + rx
BackLeft = y′ − x′ + rx
FrontRight = y′ − x′ − rx
BackRight = y′ + x′ − rx
Where rx represents the driver's rotational input.
For example, if the robot is rotated 90° and the driver pushes the joystick forward, the software adjusts the input before calculating motor power. The result is that the robot continues moving forward relative to the field, even though it is facing a different direction.
Field-centric drive can improve driver performance, but it also introduces additional system complexity. Before implementing it, teams should evaluate whether their robot, software, and drivers are ready for the added requirements. Here are the key questions teams should ask themselves.
Before implementing field-centric drive, confirm the following:
☐ Fully working mecanum drivetrain
☐ Motor directions tested and verified (robot moves correctly in robot-centric mode)
☐ Understanding of robot axes: forward, strafe, rotation
☐ IMU properly configured in the control system
☐ IMU calibrated with stable heading output
☐ Joystick inputs correctly mapped (no X/Y inversion issues)
☐ Consistent robot-centric control before adding field-centric logic
Field-centric drive may behave incorrectly if any of the following are not configured properly:
☑️ IMU mounted in a different orientation than defined in code
☑️ Missing or inconsistent IMU calibration
☑️ Heading drift during operation
☑️ Swapped forward/back or left/right axes
☑️ Incorrect motor direction inversion
☑️ Unpredictable robot behavior when rotated
Both control styles are valid in FTC. The right choice depends on the team's experience, driver preferences, and software maturity.
| Details | |
|---|---|
| Pros |
|
| Cons |
|
| Details | |
|---|---|
| Pros |
|
| Cons |
|
Do I need an IMU for field-centric drive?
Yes. Field-centric drive relies on an IMU (Inertial Measurement Unit) to determine the robot's current heading. Without heading information, the robot cannot compensate for its orientation relative to the field.
Does field-centric drive only work with mecanum wheels?
No. Field-centric control can be used with other omnidirectional drivetrains, but it is most commonly implemented in FTC mecanum drivetrains because they can move in any direction without turning first.
Is field-centric drive better than robot-centric drive?
Not necessarily. Many teams prefer field-centric controls because they are more intuitive, but robot-centric drive is simpler to implement and can be easier to troubleshoot. The best choice depends on driver preference, team experience, and robot design.
Why does my field-centric drive behave incorrectly?
Common causes include incorrect IMU orientation settings, heading drift, swapped joystick axes, incorrect motor directions, or errors in the coordinate transformation equations.
Should rookie FTC teams use field-centric drive?
Rookie teams can certainly use field-centric drive, but it is usually best to first ensure the robot drives reliably in robot-centric mode. Once the drivetrain, motor directions, and controls are working correctly, field-centric control can be added as an upgrade.
Field-centric drive is a popular control method in FTC because it allows robot movement to remain aligned with the field rather than the robot's orientation. By using an IMU to track heading and applying a simple coordinate transformation, teams can create a more intuitive driving experience that reduces the need for constant mental reorientation during matches.
While field-centric drive introduces additional software complexity and requires a properly configured IMU, many teams find the benefits worthwhile, especially when using mecanum drivetrains. Whether your team chooses field-centric or robot-centric control ultimately comes down to driver preference, experience, and what works best for your robot and game strategy.
Quick Summary: This article walks FTC teams through everything needed to program a mecanum drivebase using the FTC Drive Base Kit from Studica Robotics. You’ll learn how mecanum wheels work, how to configure motors in the Driver Hub, build a working TeleOp program, create a basic autonomous routine, and improve performance through tuning techniques like dead zones and input scaling. Whether you're new to FTC or refining your drivetrain, this is a practical, team-ready resource for building smoother, more precise robot control.
Mecanum drivetrains are one of the most powerful and flexible systems used in FTC robotics. When programmed correctly, they allow your robot to move in any direction - forward, backward, sideways, and rotationally - all independently. This article is designed to help teams using the Studica Robotics FTC Drive Base Kit, though the concepts apply to any FTC mecanum drivetrain. For this tutorial, we’ll use a mecanum drivebase built with the mecanum wheel set from Studica Robotics, along with an FTC Control Hub, Driver Hub, and a standard FTC-legal gamepad. All programming will be done in Blocks through the Control Hub’s web-based interface.
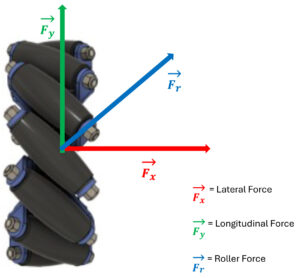
[caption id="attachment_22015" align="alignright" width="300"]
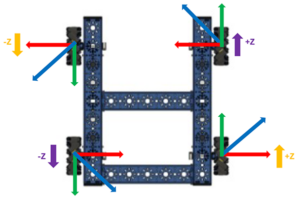
Force Diagram of Mecanum Wheel[/caption] Mecanum wheels use rollers positioned at a 45° angle. Instead of pushing straight forward like traditional wheels, each wheel produces a diagonal force vector. That force can be broken into:
A single wheel alone isn’t very useful, but when all four wheels work together, those forces combine and cancel in specific ways to create controlled movement.
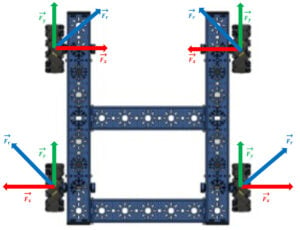
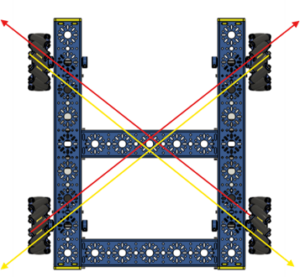
A mecanum wheel has angled rollers that create force vectors at 45 degrees. When these forces combine across four wheels, the robot can move forward, backward, sideways, or rotate. The “X” wheel configuration:
This is what makes mecanum drivetrains holonomic, allowing full directional movement without turning first.
Force Diagram of Each Wheel in a Mecanum Drivebase |
X Pattern of Wheels in a Mecanum Drivebase |
Before coding, you must configure the robot hardware in the FTC Driver Station. This tells the Control Hub which ports each electrical device, such as motors, servos, and sensors, is connected to.
1. Power on the Control Hub and Driver Hub.
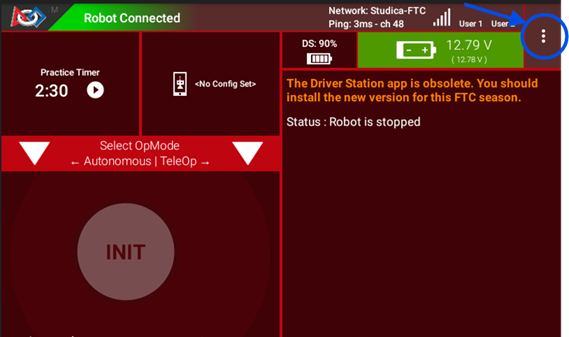
2. Open the Driver Hub and connect to the Control Hub. To get to step 3, teams would need to open the Drive Station App built into the driver hub.
3. Tap the three dots (⋮) in the top-right corner.
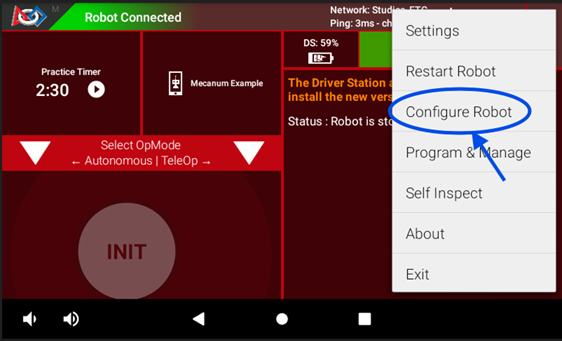
4. Select Configure Robot.
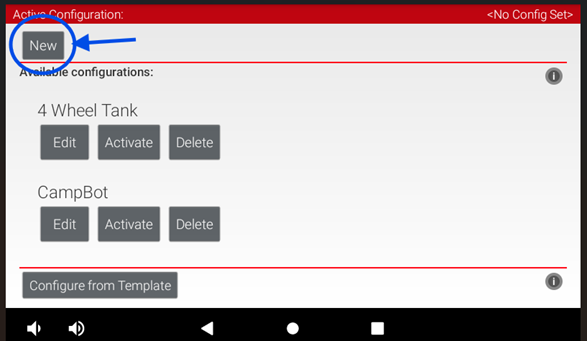
1. Tap “New”
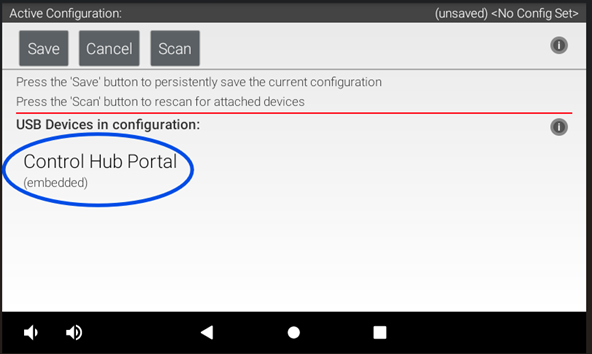
2. Select your hardware type (Control Hub) and click on the “Control Hub Portal”
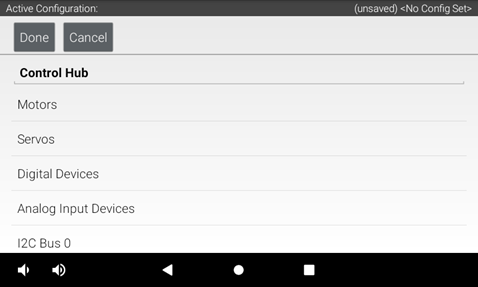
3. You will see a list of available ports.
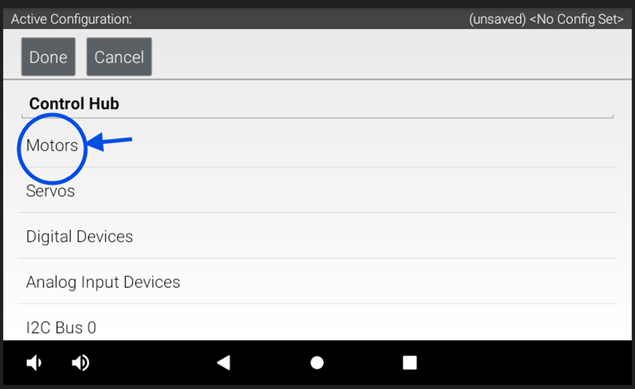
1. Tap on a Motor Port (example: Port 0)
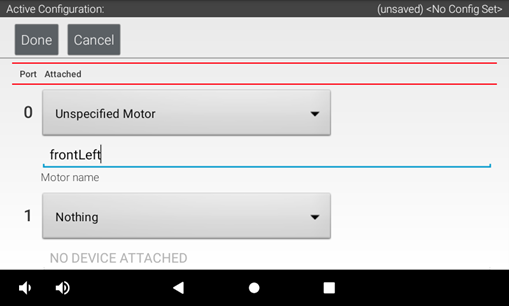
2. Assign each motor port to the correct motor and name each motor
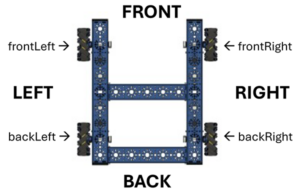
3. Name the motors based on the drivetrain’s perspective (front, back, left, right). For this configuration, our motors are labeled as: 
| Motor Name | Port |
|---|---|
| frontLeft | 0 |
| frontRight | 1 |
| backLeft | 2 |
| backRight | 3 |
Tip: Use consistent directional names like frontLeft, frontRight, backLeft, and backRight. This prevents confusion later in programming.
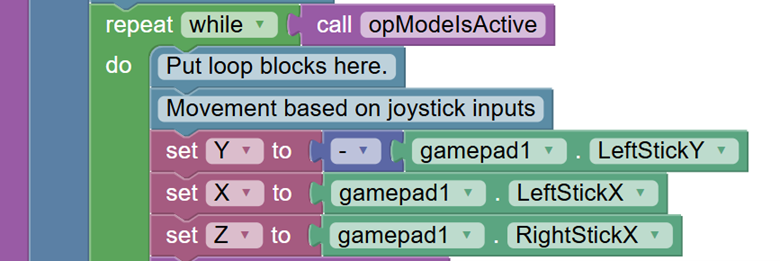
The example TeleOp program shown below uses a simple block-based structure, making it easy to map driver inputs directly to robot movement controls. The information in this section introduces the key concepts you’ll need to understand before working through the drag-and-drop version of the program.
Use the following control mapping as a reference for robot movement. The left joystick controls forward/backward and strafing, while the right joystick controls rotation.
| Motion | Controller Input | Axis |
|---|---|---|
| Forward / Backward | Left stick up / down | Y-axis |
| Strafe | Left stick left / right | X-axis |
| Rotation | Right stick left / right | Z-axis |
Before writing any movement logic, the drivetrain motors need to be configured so they respond correctly during operation.
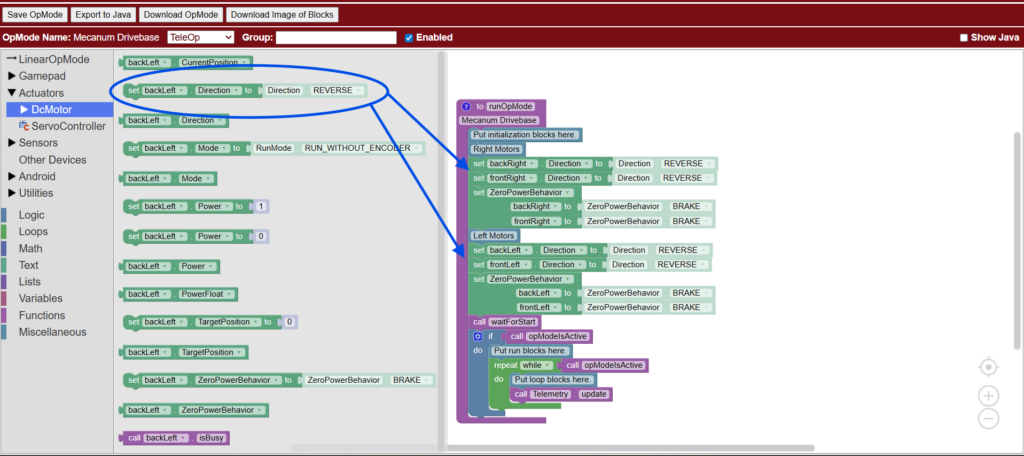
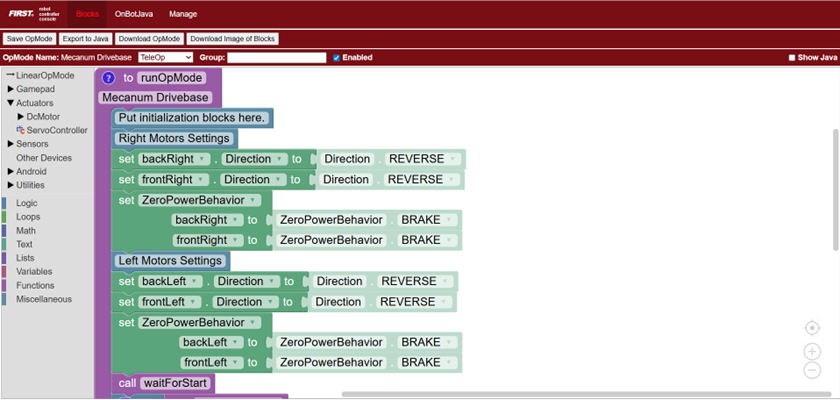
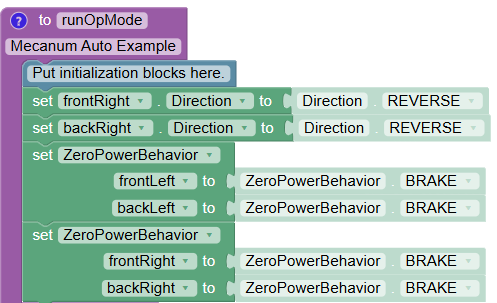
Because the motors on opposite sides of a mecanum drivetrain face opposite directions, one side must be reversed. This ensures that when the robot is commanded to drive forward, all four wheels spin together in the correct direction. Here is the code showing motor direction configuration, where one side of the drivetrain motors is reversed so all wheels rotate correctly for forward movement. This code determines how motors will behave when not powered.
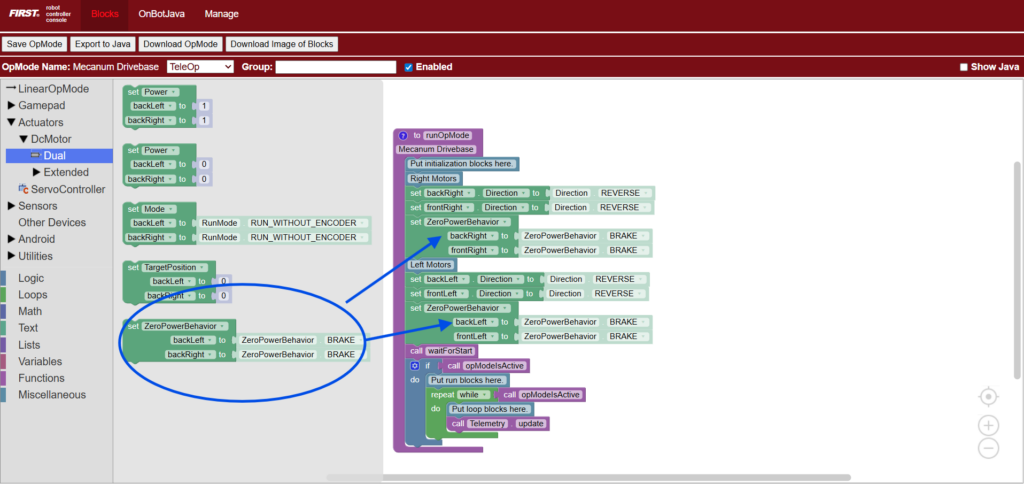
Zero Power Behavior determines how the robot responds when no power is being applied. Setting this to BRAKE causes the motors to stop immediately and hold their position when the driver releases the joysticks. The drivetrain will stop immediately and try to hold its position. This provides more precise control during TeleOp. Here is the code setting drivetrain motors to BRAKE mode, causing the robot to stop immediately and resist rolling when joystick input returns to zero.

Next, create the variables that will control robot movement. These variables represent the three primary directions of the mecanum drive, along with a scaling value used to normalize motor power.
Here, the code is creating variables for mecanum drive control, including forward/backward, strafing, rotation, and motor power normalization.


When multiple joystick inputs are combined, motor power values can exceed the allowed range of -1.0 to 1.0. Normalization scales all motor values proportionally so the strongest motor runs at full power while preserving the intended direction of movement. Without normalization, motor values are clipped, which causes uneven power distribution and unpredictable motion.
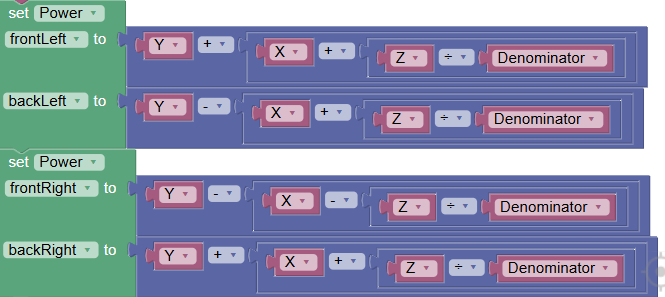
Each wheel receives a combination of X, Y, and Z values. These equations determine how forces combine to produce omnidirectional movement.
Each value is then divided by a normalization factor when necessary.
Because each wheel contributes differently, combining these inputs creates full omnidirectional motion.
Before diving into the full autonomous example, it’s important first to understand the foundation of Autonomous Programming in FTC. This section begins with Initialization and Calling Functions, which set up how the robot’s motors and systems will behave before any movement starts. Defining motor behavior early ensures your autonomous runs accurately and consistently, while clearly structuring functions helps you understand what each part of your code is responsible for before putting everything together into a complete autonomous sequence.
As previously demonstrated in the TeleOp example, set the motor direction so that the all the wheels move in the same direction to drive forward. Then set the motors so that all the wheels brake when motor power = 0
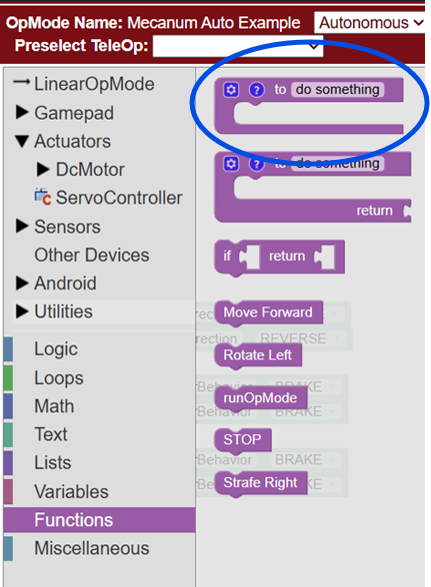
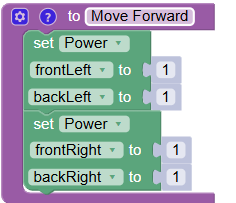
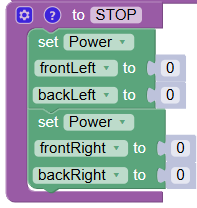
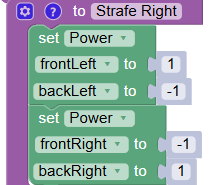
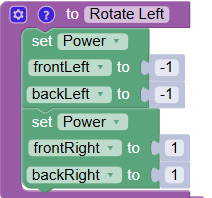
For this autonomous example, each movement of the robot is separated into its own function. A function is a reusable block of code to perform a specific task. So instead of repeatedly writing the same motor commands, you can group them into a single function and call those commands whenever needed. Create the following functions below. These functions define the motor outputs to perform each movement. The “STOP” function sets all motor power to zero, ensuring the robot halts before executing the next action
Autonomous code runs sequentially from top to bottom. Each block is executed in order, one after another. A simple FTC autonomous routine often begins with timed movements. Here is an example flow:


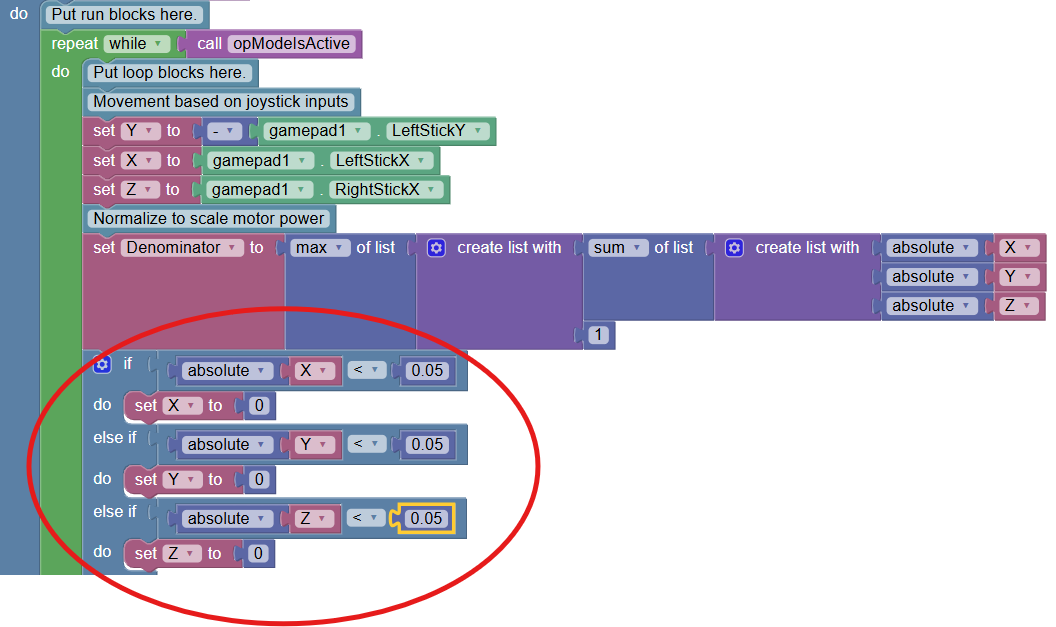
Deadzones prevent unintended motion when the joystick is near zero.
Tradeoff: Too large of a deadzone can reduce fine control. 
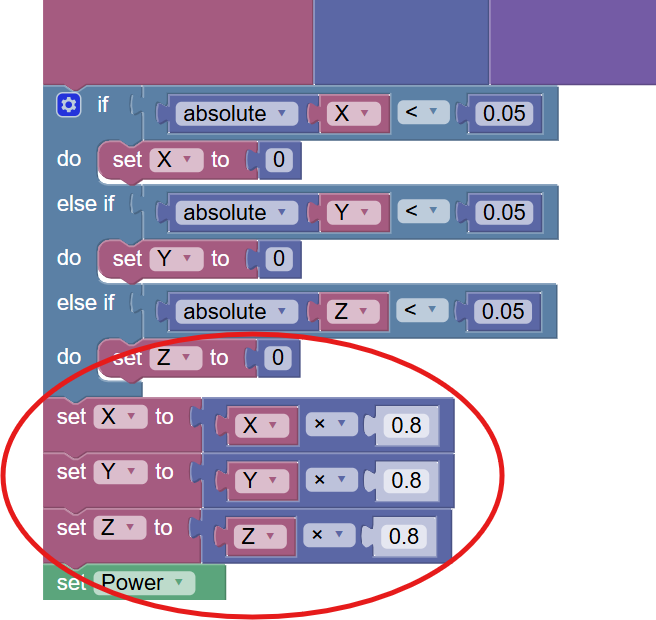
Input scaling reduces maximum speed for better precision.
Tradeoff: Lower maximum speed. 
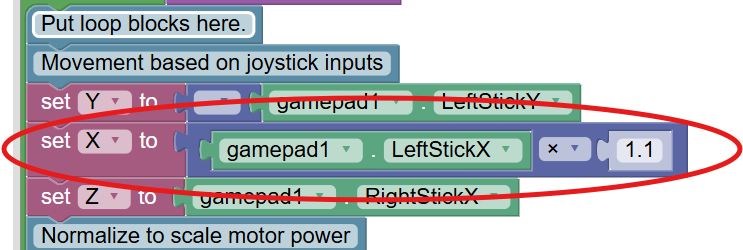
Mecanum wheels are typically less efficient when moving sideways than forward. Slightly increasing the X input can improve balance between strafe and forward speed. 
Here are some common issues FTC teams face when programming their mecanum chassis, along with helpful tips to fix them.
| Issue | What to Check / Fix |
|---|---|
| Robot moves incorrectly | Verify the motor direction settings in the code and ensure the motors are mapped correctly. |
| Robot drifts | Confirm proper normalization is implemented and check wheel alignment. |
| Strafing doesn’t work | Ensure mecanum wheels are installed in the correct “X” pattern and motor mapping matches your code. |
| Motors behave inconsistently | Use telemetry to monitor joystick inputs and motor outputs in real time. |
Telemetry helps teams debug by showing live data from the robot while the code is running. Instead of guessing what the robot is doing internally, telemetry lets you see exactly what the robot thinks is happening in real time.
In FTC programming, you typically use telemetry during testing to compare what you expect the robot to do with what it is actually doing. If something looks wrong, telemetry helps you narrow down whether the issue is coming from the controller inputs, your code logic, or the motors themselves.
Here are some of the most common things teams use telemetry to check:
| Debug Area | What It Shows | How It Helps |
|---|---|---|
| Joystick inputs (X, Y, Z) | Gamepad values (-1 to 1) for each stick axis | Confirms controller inputs are being read correctly and helps identify mapping or control issues |
| Motor output values | Real-time power sent to each motor | Verifies drivetrain math, motor direction, and whether power is being applied correctly |
| Real-time robot behavior | Key variables like drive mode, speeds, or sensor data | Helps you understand what the robot is doing while running and isolate logic vs hardware issues |
This is one of the most valuable debugging tools in FTC programming because it turns invisible code behavior into clear, readable information you can act on immediately.
The Studica Robotics FTC Drive Base Kit is designed to make mecanum programming easier by providing:
This allows teams to focus less on mechanical inconsistencies and more on learning core robotics concepts like kinematics, control systems, and autonomous design.
What is mecanum drive in FTC? Mecanum drive is a holonomic drivetrain that allows a robot to move in any direction without turning first. Why do FTC teams use mecanum wheels? They provide full directional movement, making scoring, alignment, and positioning faster and more efficient. Why is my mecanum robot drifting? Common causes include incorrect motor direction, missing normalization, joystick drift, or mechanical misalignment. Do I need to normalize motor power? Yes. Without normalization, combined inputs can exceed motor limits and cause unpredictable movement. What is the best way to learn FTC mecanum programming? Start with TeleOp control, then add tuning features like deadzones and scaling. Once you're comfortable, move on to encoder-based autonomous routines.
Programming an FTC mecanum drivetrain is one of the most important skills for competitive robotics teams. Once teams understand how forces combine across all four wheels, they can unlock smooth omnidirectional movement, precise driver control, and reliable autonomous performance. With the Studica Robotics FTC Drive Base Kit, teams gain a strong mechanical foundation, allowing them to focus on what really matters: writing smarter code, improving control, and building better autonomous strategies.
Quick Summary: The countdown is on for the FIRST® Championship 2026. Teams from around the world are heading to Houston for this global robotics event featuring FTC DECODE™ and FRC REBUILT™, bringing together thousands of students, mentors, and innovators. This is where the FIRST® AGE™ season comes to life.
The energy is building, the robots are ready, and teams are preparing for one of the most exciting events in STEM. The FIRST® Championship 2026, presented by BAE Systems, takes place from April 29 to May 2 in Houston, Texas.
This event becomes a global hub of innovation, bringing together more than 50,000 attendees, 19,000 students, and over 1,000 teams from 66 countries. For many, this is the moment everything has been building toward: a chance to compete, connect, and celebrate a season of hard work and discovery.
The FIRST® Championship is more than a competition; it’s a global celebration of creativity, collaboration, and the future of STEM. Students,
mentors, and educators come together not just to compete, but to share ideas, learn from one another, and be part of something bigger. It’s where you see months of iteration come to life on the field, where innovative designs are pushed to their limits, and where teams discover what they’re truly capable of.
From intense matches to inspiring conversations in the pits, every moment is an opportunity to grow. It’s this combination of competition, community, and purpose that makes the FIRST® Championship unlike anything else.
This season, innovation takes center stage as teams explore the FIRST® AGE™ archaeology-inspired robotics season and push their designs further than ever.
DECODE™ challenges FIRST® Tech Challenge (FTC) teams to investigate the power of artifacts in an archaeology-inspired game. With a focus on scoring, strategy, and teamwork, teams must shoot, manage, and adapt in a fast-paced, dynamic field. REBUILT™, on the FIRST® Robotics Competition (FRC) side, invites teams to reimagine the past while engineering for the future. With large-scale robots and high-energy matches, precision, performance, and collaboration are key.
Studica Robotics will be on-site in the FTC and FRC Robot Service Centers, working directly with teams throughout the event, helping troubleshoot, optimize, and keep robots competition-ready.
For more than 40 years, Studica has supported education and industry with technology designed to help learners build real-world skills through hands-on experience. Through its robotics division, Studica Robotics continues that mission by developing a modular building platform designed for STEM education and competitive robotics teams.
Engineered for compatibility, strength, and ease of use, Studica Robotics components are designed to integrate with common FRC and FTC ecosystems without requiring specialized tools or complex setup. The platform includes a wide range of robot parts, from structure and motion components to controllers, sensors, IMUs, motors, and navigation tools, supporting teams from early prototypes to competition-ready robots.
This season, several Studica Robotics solutions stand out as teams prepare for competition.
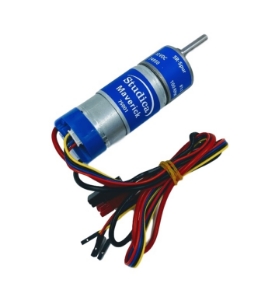
The Studica Robotics FTC Starter Kit for the 2025–2026 DECODE™ season is designed to help teams move quickly from concept to competition-ready robot. Available in six structure colors, the kit supports flexible design, rapid prototyping, and hands-on learning throughout the build season. New for this year, the kit includes 6mm HEX components and shafts, and updated Maverick HEX shaft motors with multiple planetary gearbox options, giving teams more control over drivetrain performance, torque, and mechanism design.
The FTC Starter Bot, built using the Starter Kit, provides a functional baseline robot for DECODE™ gameplay. It helps teams spend less time on initial fabrication and more time on iteration, strategy, and refinement. Designed to demonstrate core tasks such as receiving and holding game pieces, moving them across the field, indexing into a mechanism, shooting toward the goal, actuating field elements, and running a basic autonomous routine, it gives teams a clear starting point for development. While fully functional, the design is intentionally a starting point, giving teams room to modify and improve based on their own strategy and ideas.
For FRC TeamsFor FRC teams, consistency and control are critical. The NavX3-CAN IMU provides high-speed, accurate motion data to support reliable navigation, stable drivetrain control, and improved autonomous performance. With upgraded sensing architecture and fast CAN-FD communication for reliable, high-speed data transfer, this next-generation inertial measurement unit (IMU) helps teams maintain orientation and improve repeatability in both autonomous and teleoperated modes.
When combined with a range of FRC-ready components, Studica Robotics supports teams building systems that prioritize accuracy, durability, and performance under pressure. From structural components to advanced sensors, Studica Robotics helps teams build with confidence and compete at their best.
FIRST® is about more than robots. It’s a global community built on mentorship, innovation, and opportunity.
Through hands-on learning and team-based problem-solving, students gain the skills, confidence, and resilience to succeed, whether they pursue careers in STEM or take these experiences into entirely new paths. Programs like FIRST® Tech Challenge and FIRST® Robotics Competition continue to inspire the next generation of engineers, leaders, and innovators, proving year after year that the impact goes far beyond the field.
What is the FIRST® Championship 2026?
The FIRST® Championship is the global finale of the FIRST® season, bringing together thousands of students from around the world to compete at the highest level across four programs: FIRST® Robotics Competition (FRC), FIRST® Tech Challenge (FTC), FIRST® LEGO® League Challenge, and FIRST® LEGO® League Explore.
When and where is the FIRST® Championship 2026 happening?
April 29 to May 2, 2026, at the George R. Brown Convention Center in Houston, Texas.
What are FTC DECODE™ and FRC REBUILT™?
They are the 2025–2026 FIRST® game challenges. DECODE focuses on artifact-based gameplay and strategy, while REBUILT features large-scale robot competition and alliance strategy.
Will Studica Robotics be there?
Yes, Studica Robotics will be supporting teams in the FTC and FRC Robot Service Centers.
Is the FIRST® Championship and "FIRST® Worlds" the same thing? Yes. “FIRST® Worlds” is a term commonly used by teams to refer to the FIRST® Championship, the official global event that concludes the season.
The excitement is building, and the FIRST® Championship 2026 is set to be an unforgettable celebration of innovation, teamwork, and discovery. Whether you’re competing, mentoring, or cheering from the sidelines, this is the moment everything comes together. If you’re heading to Houston, be sure to connect with the Studica Robotics team in the FTC and FRC Robot Service Centers. We’re there to help teams stay ready, solve problems, and keep competing at their best.
Good luck, teams!
Quick Summary: Your robot’s drivetrain determines how it moves on the field, how easy it is to control, and how well it performs during matches. For FTC teams and other robotics programs, the most common options are tank drive, mecanum drive, and other holonomic systems like X-Drive or Kiwi (A-Frame). This article breaks down the advantages, disadvantages, programming complexity, and strategic uses of each drivetrain type so teams can make informed design choices.
Your robot’s drivetrain is the foundation of how it moves and interacts with the game field. Choosing the right drivetrain affects not only performance but also how easy it is to build, program, and drive during a match.
A well-designed drivetrain impacts:
Speed: How quickly your robot moves across the field.
Maneuverability: How easily it changes direction.
Traction: Grip on the game surface.
Mechanical complexity: Difficulty to build and maintain.
Driver control: Ease of operation during matches.
Tank drive is one of the most common drivetrains for FTC robots, especially for beginner teams. Its straightforward design and simple control make it ideal for teams focusing on pushing power, defense, and reliability. While it doesn’t allow sideways movement (strafe), it’s durable, easy to build, and simple to program, making it beginner-friendly.
| Details | |
|---|---|
| Description | Wheels on the left and right sides move independently. Forward/backward is simple; turning requires spinning one side faster. |
| Advantages | High traction and pushing power; simple to build and maintain; beginner-friendly; durable and reliable. |
| Disadvantages | Cannot strafe sideways; slower alignment with targets; less efficient for fast, precision scoring. |
| Best Use Cases | Pushing/defense-focused strategies; beginner teams; games prioritizing stability over speed or complex maneuvers. |
| Programming Complexity | Low. Direct joystick-to-motor mapping; no vector math required. |
Before diving into wheel configurations, teams should consider how the number of powered wheels will affect traction, stability, and turning. Choosing the right setup can improve performance on the field without adding unnecessary complexity.
The FTC Starter Kit 2025–2026 from Studica Robotics gives teams everything they need to build a reliable tank drive robot. Made with precision 6061-T6 aluminum structure parts, it is durable, safe, and easy to assemble, making it ideal for beginner and intermediate teams focused on pushing power, reliability, and straightforward programming. The kit includes updated Maverick Motors with Hex Shafts, optional planetary gearboxes, and 6mm Hex components, and comes in six vibrant structure colors.
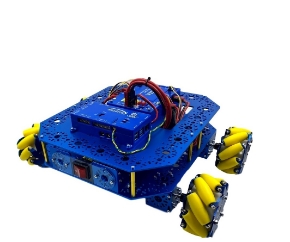
Mecanum drivetrains use four specialized wheels with angled rollers, allowing your robot to move in any direction without rotating first. This makes them highly maneuverable and ideal for scoring-focused or precision-based games. While they offer excellent alignment and cycle efficiency, they require more careful setup and programming than a tank drive.
| Details | |
|---|---|
| Description | Uses four mecanum wheels with angled rollers for omnidirectional movement. Can move forward, backward, sideways, diagonally, and rotate in place. |
| Advantages | High maneuverability; can strafe without rotating; fast alignment with scoring targets; excellent for cycle-based scoring games. |
| Disadvantages | Lower traction and pushing power than tank drives; sensitive to weight distribution; moderate-to-high programming complexity (vector math required). |
| Best Use Cases | Scoring-focused or precision-based games; intermediate to advanced teams. |
| Programming Complexity | Moderate to high; requires vector math for combining forward, strafe, and rotation inputs; motor mixing needed for smooth movement. |
Mecanum Drivebase Examples
![]() |
|
✅ The FTC Drive Base Kit from Studica Robotics is a competition-ready Mecanum drivetrain designed specifically for FTC teams.
✅ Built with reliable, precision components, the FTC Drive Base Kit supports advanced autonomous paths and demanding maneuvers.
✅ The kit is available in a variety of structure colors including blue, red, black, green, silver, and gold, with D-shaft or Hex-shaft components.
Beyond Mecanum, there are other holonomic drivetrains that allow omnidirectional movement, meaning the robot can move in any direction without needing to rotate. X-Drive and Kiwi (A-Frame) designs are less common in FTC but offer unique advantages in maneuverability and compact design. They require more careful setup and programming than tank drives or Mecanum systems, so they’re generally used by intermediate or advanced teams.
X-Drive is a holonomic drivetrain with four omni-wheels mounted at 45° angles. Like Mecanum, it allows true omnidirectional movement, but with straight rollers instead of angled rollers. This makes motion smooth and predictable, though traction is lower than a tank drive.
|
Details |
|
|---|---|
| Description | Four omni-wheels at 45° angles; moves in any direction without rotating first. |
| Advantages | True omnidirectional movement; smooth transitions; predictable motion. |
| Disadvantages | Lower traction; tricky to fit mechanically; may interfere with frame design. |
| Best Use Cases | Advanced maneuvering; games needing precise omnidirectional control. |
| Programming Complexity | Moderate to high; requires vector math and careful motor calibration. |
X-Drive Examples
![]() |
![]() |
The Kiwi (or A-Frame) uses three omni-wheels arranged in a triangle. Each wheel contributes to all directions of movement, giving omnidirectional motion in a minimal footprint. This setup is lightweight and uses fewer motors, but stability can be an issue.
| Details | |
|---|---|
| Description | Three omni-wheels in a triangular configuration; omnidirectional movement with minimal components. |
| Advantages | Fewer components; lightweight; efficient motor usage; true omnidirectional motion. |
| Disadvantages | Less stable; sensitive to weight distribution; more complex programming; requires vector math. |
| Best Use Cases | Compact or motor-limited robots; teams wanting true omnidirectional control in a small footprint. |
| Programming Complexity | Moderate to high; requires vector math; less intuitive than tank or mecanum drives. |
Kiwi (A-Frame) Examples
![]() |
![]() |
| Priority | Tank Drive | Holonomic (Mecanum/X/Kiwi) |
|---|---|---|
| Pushing / Defense | High traction, strong grip | Lower traction, easier to be pushed |
| Scoring / Precision | Slower repositioning | Faster alignment, smooth cycles |
| Speed vs. Control | Stable at higher speeds, simple | Flexible movement, higher control ceiling |
| Simplicity vs. Performance | Easier to build and program | More complex, higher performance potential |
Which drivetrain is easiest for beginners?
The tank drive is the simplest to build, program, and operate.
Can Mecanum drives push as well as tank drives?
No, they have less traction and lower pushing power, so they are better for scoring and maneuvering.
Are X-Drive or Kiwi drives common in FTC?
They are less common and are usually chosen for compact robots or specialized strategies.
How do I decide between 2WD, 4WD, or 6WD tank configurations?
2WD for prototypes/learning, 4WD for balanced performance (most FTC teams), 6WD for heavy or defensive robots.
Choosing the right drivetrain is critical for aligning your robot’s design with your team’s strategy, skill level, and competition goals. Tank drives excel in defense and simplicity, while mecanum and other holonomic drives offer superior maneuverability and precision scoring potential.
For FTC teams, solutions like the FTC Starter Kit 2025–2026 and the FTC Drive Base Kit from Studica Robotics provide practical, high-quality options for building reliable tank or mecanum drivetrains, helping teams get up and running with proven components.
Quick Summary: The NavX3-CAN robotics navigation sensor is a completely re-engineered inertial measurement unit (IMU) for FRC and competition robotics. Designed from the ground up, it features a new gyro, accelerometer, magnetometer, and CAN-FD connectivity, providing accurate sensor data, easy calibration, and improved autonomous control. Ideal for all teams, from rookies to advanced builders.
An IMU (Inertial Measurement Unit) is a sensor that tells a robot how it is moving and which way it is oriented. It combines a gyroscope, accelerometer, and magnetometer.
A gyroscope measures how fast and in which direction the robot rotates. An accelerometer measures acceleration, how quickly the robot speeds up or slows down in any direction. A magnetometer acts like a compass to detect orientation.
In robotics, including FRC and other competitions, IMUs help robots drive straight, turn accurately, and navigate the field. They provide real-time data for autonomous routines and precise control, helping teams improve reliability and overall performance.
NavX3-CAN is a completely redesigned competition IMU. Unlike the previous NavX2 IMU, nothing carries over from the earlier version. All hardware, firmware, and architecture are completely new from the ground up.
Major Advantages:
✅
Brand-new IMU, magnetometer, MCU, and CAN architecture: Offers a fresh start for modern competitions.
✅ CAN-FD connectivity: Up to eight times faster than CAN 2.0, with up to eight times more data per packet for smoother control and better logging.
✅ Easy Calibration:Mount in any position or direction, simple user app to increase accuracy.
✅ High-speed Output: User-selectable rates up to 1000 Hz for fast control loops.
✅ Durable Design: Sealed case, reverse power protection, and color-coded Wago connectors. These upgrades ensure that every team, from rookies to advanced builders, can rely on accurate sensor data without complicated setup or difficult calibrations.
✅ Accuracy: Continuous per-axis bias estimation and a custom sensor fusion algorithm reduce drift and improve autonomous performance.
✅ Simple Calibration: Orientation-independent setup saves time during build season and competitions.
✅ Team-Friendly: Works for rookies with simple setup and reliable data, while advanced teams can push for higher autonomous precision.
✅ Future-Ready Systems: Compatible with legacy roboRIO via CAN 2.0 and ready for SystemCore updates in 2027.
| Feature | Specification |
|---|---|
| Gyroscope | ±15.625 dps to ±4000 dps, 16-bit resolution |
| Accelerometer | ±2 g to ±32 g, 16-bit resolution |
| Magnetometer | ±800 µT, 13 nT resolution |
| Outputs | Yaw, Pitch, Roll, 6- & 9-axis Quaternion, Linear Acceleration, Angular Velocity |
| Voltage Range | 5–30 VDC |
| Shock Reliability | 20,000 g |
| Operating Temperature | -20°C to +85°C |
| Low Drift | No motion: ~0.0619°/hour 5 seconds after motion: ~0.0582°/min |
CAN-FD (Controller Area Network Flexible Data-Rate) is an upgraded communication protocol that sends more data at higher speeds than the traditional CAN 2.0 (Controller Area Network Version 2.0, the older standard used for connecting sensors and controllers in robotics and automotive systems). For FRC teams, this means your robot can get sensor readings faster and more reliably, improving responsiveness and ultimately smoother autonomous operation.
✅ Smoother Sensor Readings: Faster updates mean more precise and responsive control.
✅ Better Autonomous Performance: High-speed data improves autonomous routine accuracy.
✅ Seamless FRC Integration: Works with modern control systems and prepares teams for future updates.
Who should use the NavX3-CAN?
All FRC robotics teams can benefit from the NavX3-CAN. Rookie teams enjoy a straightforward setup and automatic calibration, while advanced teams gain precise control for complex autonomous routines.
How is it different from the NavX2?
The NavX3-CAN is a complete redesign. All hardware, firmware, and architecture are new, providing a modern competition-ready IMU and competition robotics sensor for FRC.
Do I need to worry about calibration?
Before NavX-sensors are shipped, the accelerometers and gyroscopes are initially calibrated at the factory; this calibration data is stored in flash memory and applied automatically to the accelerometer and gyroscope data each time the NavX-sensor circuit board is powered on. A simple PC app allows the user to re-calibrate to help increase accuracy. While calibrating, the sensor will automatically detect its orientation.
Can I use it with older roboRIO systems?
Yes. The sensor supports CAN 2.0 for legacy systems and also offers CAN-FD for high-speed data and improved control performance.
Will it improve autonomous performance?
Yes. The NavX3-CAN delivers improved accuracy, low yaw drift, and reliable sensor data, making autonomous routines more precise and effective in FRC competitions.
Studica Robotics offers FRC-ready components to support your build:
Bonded wire with rated insulation and high flexibility, including 4 AWG, 6 AWG, 10 AWG, 12 AWG, 16 AWG, 18 AWG
CAN Wire for high-speed sensor communication
Sensor Wire for reliable connections
Each of these accessories is designed to help teams build faster, wire reliably, and focus on programming and autonomous performance.
The NavX3-CAN makes your robot smarter, easier to program, and more reliable on the field. Whether you’re a rookie team taking your first steps or an advanced team chasing precision, it gives you the edge you need this FIRST® Robotics Competition REBUILT™ season.
Studica Robotics also offers a range of FRC-ready components to support your build, including flexible bonded wire in multiple gauges, CAN and sensor-specific options, and pre-drilled extrusion at competitive prices. These tools help teams get up and running quickly so they can focus on programming and optimizing autonomous routines.
Get ready for an exciting FRC season and take your robot’s performance to the next level with NavX3-CAN and the supporting components designed to help your team succeed.